
Digital art is transforming the world by leveraging powerful technology. It is tempting, it is aesthetically pleasing, and most importantly, it gives you options. Options to save time, alter the designs with just a few clicks and create affordability. Amongst such ventures of digital art, vector tracing is the one that is gaining considerable traction. Vector images are getting pretty significant in use, especially in the embroidery and print segment of the fashion industry, precisely why you may require the vector tracing service to convert logos or pictures from bitmap formats into vector formats.
What Makes Vector Images Unique?
There are two common types of image files: vector images and raster images. The primary difference between the two is that raster images use small dots or pixels to construct a picture, while vector images use lines, curves, and shapes to draw a picture.
You will not see much of a difference between a raster image and a vector image of the same at a smaller size. The dissimilarity becomes apparent when you increase the image size. The raster image will become blurry, losing both quality and pixelation.
A vector image, however, does not regress with magnification or image enlargement. This stand-out feature of vector images has what made them so unique and famous.
What is Vector Tracing?

The raster to vector conversion of the images is carried out through vector tracing.
Vector Tracing is a digital photo editing technique that works on image tracing. It converts the raster images in bitmap formats (.JPG, PNG, etc.) into Scalable Vector Graphics (.SVG). Photo editing tools like Coral Draw or Adobe Illustrator use mathematical algorithms to draw vector images. Vector images look sharp and clear in any scaled size, triumphing over the bitmap formats that get pixelated and distorted when magnified.
Vector Tracing Services in Fashion Industry
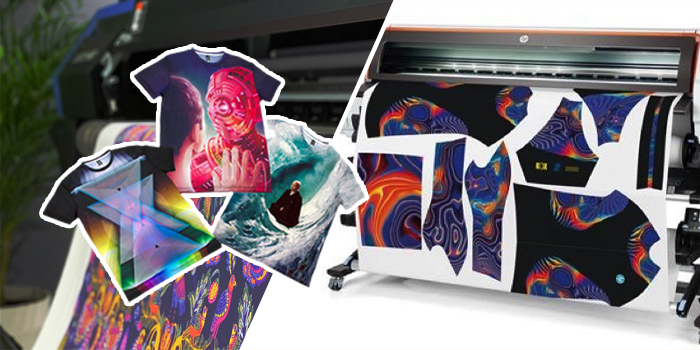
This advantage makes vector images the ultimate designing choice in the fashion industry. Vector images can not only be used as logos and wallpapers; you can also print them on clothes as stickers and image labels. Just hand over your favorite and personalized pictures to trace to the vector tracing service of your choice and put the crispness of the images to good use.
Vector Art In Printing Services
Vector tracing services are required for several printing methods like Screen Printing, Direct-to-Garment Printing, Direct-to-Film Printing, Sublimation Printing, and Reactive Printing are a few examples. Vector art is also used for Laser Engravings due to its higher quality.
Let us get to know why vector art is crucial for these procedures.
• Laser Engraving: It is a practice of using lasers for etching a design or image on a solid surface like leather, glass, metal, or even textile materials. In the fashion industry, vector art in Laser Engraving is preferred if thin lines are engraved on the apparel. It is also faster than raster image engraving.
• Reactive Printing: This method uses reactive dyes and steam to print permanent designs on the fabric. Reactive printing using vector images is ideal when the images are complex, and lines and curves are sharper.
• Direct-to-Garment & Direct-to-Film Printing: The main difference between DTG & DTF is that in DTG, the design is printed directly onto the fabric. While in DTF, the image is first printed on a transparent film and then coated with an adhesive to stick it onto the textile using a heat press.
These processes also deploy vector graphics because vector images quickly adapt to any resolution of the printing screen or the printing device.
.jpg)
Sublimation Printing: Transfering a design onto a surface using ink and heat is Sublimation Printing. In this process, the image is first printed on a transfer paper, and then the fabric and the transfer paper are passed through a heat transfer machine. The image on the transfer paper is thus transferred to the material. It requires the printed image to have a high quality to get the best results. Vector images have no pixelation; hence they are the best choice.
The vector images can be printed on the apparel without any loss in clarity & quality using all such techniques.
Top-notch creativity and skillset are required for this, which is why Cre8ive Skill has, in fact, made itself technologically advanced in the state-of-the-art machinery, quality software, and superior skills when it comes to vector tracing service.
Why Are Good Vector Tracing Services Crucial?
Every single thing communicates a message. Whether you are an individual or a business, you always need to convey the right message with whatever you choose. The image, colors, contrast, and quality play a key role in your brand or clothing items. You cannot risk an unprofessional image file provided by any low-quality service provider.
To get the very best out of the images or logos that you choose for vector conversion, you need someone who understands you and your requirements, all the while providing you the best value for money. Going for quality vector conversion services like Cre8ive Skill will ensure that you never regret your choice.
Which Vector Tracing Service You Should Choose?
Not everyone is determined to offer top-quality vector tracing & conversion at affordable prices in the fashion industry. Vector images are not just simple lines and curves; they require extreme attention as well.
Here comes the critical question.
What exactly makes a vector tracing service stand out from the rest?
Let me mention a few features that you should never ignore:
1. Experience & Expertise
That is, by default, the first and foremost requirement expected of any service. Always go for a vendor having a team with vast experience and expert graphic designers—one who prioritizes you and your satisfaction first. Vector art is a delicate and detail-oriented process. The vectorization should always be handled with care and precision., workmanship should be exceptional. And this comes with experience and expertise.
How about a service that will amaze you with accuracy, attention to detail, and extraordinary artwork? Here’s Cre8ive Skill who believes in customer satisfaction more than anything else.
Are you looking for vector design for the fashion industry? Cre8ive Skill is the way to go with our machine-friendly designs and fine detailing.
2. Quality Checks
I would love to choose a service that would take care of all my needs while ensuring the design quality of my vector images. And I guess you would too. What’s even better? The artwork going through a controlled and efficient quality check system.
Cre8ive Skill provides you with just that. A sigh of relief and peace of mind for you while the quality control department goes through your vector images several times to guarantee top-notch individuality and defect-free artwork.
3. Avoiding The Use of Auto-Tracing
Let’s try to understand what automatic image tracing is and how it differs from manual drawing first.
There are commonly two ways to draw a vector image using image vectorizer tools like Adobe Illustrator.
- Manual Image Trace: This technique involves drawing the vector image by hand using a mouse or a graphics pen on a tablet to trace the image.
- Auto Image Trace: Automatic tracing uses software automation to detect the lines and curves of the raster image to create a vector image. The image trace tool in Adobe Illustrator and Scan2CAD are specific examples. Inkscape trace bitmap feature is another example.
Why strictly should the automatic photo tracer be avoided? It’s because the auto trace cannot recognize the low-resolution areas of the raster image accurately. Furthermore, automatic tracing results in inferior quality vector images if the color density of the raster images is very high.
Manual tracing, on the other hand, works with images of any quality. A human can always understand better than a machine were to draw a line or a curve and what the image should represent. It is more or less 100% accurate and even works for complex illustrations or photos.
For the reasons mentioned above, make sure that the vector tracing service you choose is vectorizing your images manually instead of just auto-tracing them. With Cre8ive Skill, you will get every vector image manually traced in vector file converter software to provide you with impeccable quality.
4. Efficient Delivery Timeframe
Make sure that your chosen vector designing vendor provides you with perfect image tracing in a reasonable timeframe. Though manual tracing takes time, it can’t be that they keep your image pending for an extended period of days or weeks.
If you want the delivery to be efficient and quick, Cre8ive Skill should be your choice. Most of the other vector tracing services have a turnaround time of 48-96 hours; cre8ive Skill, in fact, does it in 12.
After all, who doesn’t like quality work delivered right on time?
5. Reasonable & Affordable Price
Take a look around, and you may find services offering image vectorization at the starting prices of $60 going all the way up to $135 per image. Does that sound affordable even if it ensures quality work?
Absolutely not.
Here’s where Cre8iveSkill comes into play. Exceptional quality, aesthetically desirable designs, manual tracing, artistic and attractive visualization, quickest turnaround, and whatnot. Top-quality service with affordable prices, all the while taking care of your unsaid needs, there’s nothing you have to worry about. Hence, with Cre8ive Skill, you are in safe hands.
Source: https://www.cre8iveskill.com/blog/vector-tracing-service-how-to-choose-the-best-one


