Friday, October 1, 2021

A To Z Glossary on Embroidery Digitizing | Cre8iveSkill

1. Applique:

An old design technique in which cuttings of particular shapes, motifs, or patterns from pieces of fabrics are stitched onto another material to add dimension.

2. Arm Machine:

Arm machine is a stitching machine to automatically sew chain stitch design patterns or narrow-width tubular seams on heavy fabrics like denim and jeans.

3. Arrowhead Stitch:

It is a type of stitch that has a diagonal stitching pattern that has a zigzag effect. In this type of embroidery, two straight stitches meet to create the shape of an arrowhead.

4. Bump:

A bumpy or raised style of stitching that sits on top of the base rows in the previous round of crocheting, creating a three-dimensional effect.

5. Backing:

Any woven or non-woven material, also known as a stabilizer, placed permanently or temporarily underneath the base fabric to be embroidered for stability and support.

6. Basting Stitch:

Basting or tacking refers to quick and temporary stitches made with the purpose of removing them later to hold a seam in place until proper final stitches.

7. Bean Stitch:

Three or more stitches are made back and forth repeatedly between two specific penetration points for outlining more boldly and strongly than a simple run stitch.

8. Birdnesting:

Birdnesting refers to threads bunching up in a messy knot below the needle plate while embroidering. It leads to broken threads, improper stitches, and uneven tension.

9. Bobbin:

A small reel or spool wound with the thread meant for lockstitch machines. They can also be wound on sewing machines or sold pre-wound from the supplier.

10. Blanket Stitch:

A kind of stitch that reinforces the edges of blankets and other thick fabrics. It can also be used as a decorative stitch for borders and edges.

11. Buckram:

A piece of stiff and coarse backing fabric is used to stabilize a softer material to hold it erect and show the embroidery pattern on the front side.

12. Bullion Stitch:

It is a decorative embroidery technique where the thread is twisted several times around the needle before inserting it into the fabric. It adds dimension to the embellishment.

13. Chain Stitch:

It is an embroidery technique formed by a series of loops that resembles a chain pattern made by inserting the thread from the bottom of the fabric.

14. Chenille:

It is a form of embroidery, also known as loop piling, using heavy yarns like wool or acrylic to form loop stitches on the upper side of the fabric.

15. Condensed Format:

T is a method of saving a digitized design in its skeletal form. The number of stitches between the defined points is determined afterward after scaling the size.


16. Cutaway:

A permanent embroidery stabilizer that supports a softer fabric on top to help with embroidery and make it look erect and prominent.

17. Degrade:

A technique of embroidery that involves color shading. The colors in the design shade from the darkest pigment to the lightest without being demarcated.

18. Digitizer:

Someone responsible for operating and supervising the computer program or the embroidery digitizing software that digitizes an embroidery design and stores it for future use.

19. Diamond Stitch:

A decorative crochet knitting done using double crochet rows and post stitch rows is arranged in a manner that appears to make diamond shapes.

20. Disk Reader:

It is an internal or external device fed into the programming of a digitized embroidery machine to determine the sequence of needle movements and produce the desired design.

21. Editing:

It is the process of changing parts of a design to modify the final product through a computerized embroidery editing program that allows scaling, editing stitches, and making combinations.

22. Embroidery:

The art of embellishing a piece of fabric using threads by following a stitching pattern or sewing technique to produce a particular design or pattern is called embroidery.

23. Expanded Format:

A digitized design format where individual stitches are set to a specific size and the stitch count is constant. The designs cannot be scaled up or down without distortion.

24. Frogging:

Frogging is an act of having to unpick or undo the knitting or crocheting pattern due to an error made in between or with the intention to change the design.

25. Flagging:

The distorted up and down motion of the fabric, akin to a flag, due to incorrect hooping, lack of embroidery stabilization, and misadjusted presser foot.

26. Framing Press:

The machine helps with the framing and hooping process while carrying out the embroidery. It provides back support and maintains the tension of the fabric.

27. Gapping:

It is a flaw in the embroidery where the base fabric is visible amidst the design because of an error causing a gap in the stitching technique.

28. Gilt:

Gold-painted metal threads or textile threads having golden metal leaves wound around them. The threads can be silver or copper, too other than imitation gold.

29. Goldwork:

The art of embroidery using gold-painted metal threads or metal leaves wound around textile threads, secured to the fabric using a second silk thread.

30. Hardanger:

It is a form of whitework embroidery made with white thread over white, even-weave linen cloth. It follows the counted-thread technique as well as the drawn-thread method.

31. Herringbone Stitch:

A style of stitching used in embroidery, crochet, and knitting that follows a pattern resembling the bones extending outwards from the spine of a herring fish.

32. Hook:

Equipment that holds the bobbin case in the embroidery machine, which rotates twice, meeting the top thread at a set time and distance to complete each stitch.

33. Hoop:

A plastic, wooden, or metal device that grips the base fabric for the embroidery between the outer ring and the inner ring to maintain adequate tension.

34. Ikat:

An Indonesian form of dyeing and weaving technique where the yarn is made to resist the dying before the actual process of weaving and coloring.

35. Interlaced Stitch:

A series of stitches where a second or a third thread is interlaced through the first line of foundation stitches without passing through the base fabric.

36. Jacobean:

A style of embroidery named after the period of King James I of England consisted of elaborate and ornate flowers, leaves, vines, birds, and animals.

37. Jumbo Rotary Hook:

A large-sized hook in the bobbin driver is present in lockstitch sewing machines, which continuously rotates to hook the upper thread when it crosses the 12 o’ clock position.

38. Jump Stitch:

The moving of the pantograph and the rotating of the sewing head without any movement of the needle. It helps to move from one point to the other in the embroidery.

39. Lockstitch:

A stitch is formed by interlocking the needle thread with the bobbin thread. The machine loops together with the two threads on each side of the fabric.

40. Looping:

Loops formed on the top surface of the embroidery pattern due to improper tension of the top threads or as a result of skipped stitches.

41. Merrowed Edge:

A heavy border is sewn over the edges of the patch stitched on a piece of fabric. It is generally done in geometrical shapes like ovals, squares, and circles.

42. Monogram:

A subset of embroidery where small patterns or motifs, such as initials or logos are sewn onto a piece of fabric as a stamp or decoration.

43. Moss Stitch:

A form of embroidery, also known as chenille or loop piling, made using heavy yarns to form loop stitches on the upper side of the fabric.

44. Needle:

The device is used to form the stitches in an embroidery process, carrying the thread through the fabric by passing through various points using various techniques.

45. Nippers:

Nippers, also known as thread clippers, are small scissors with springs that can be used to clip threads using only the thumb finger and the forefinger.

46. Offset:

A method used for placing and attaching appliques by moving the pantograph from the stitching area in a pre-set movement and returning to the origin.

47. Pantograph:

A section of the embroidery machine resting on the top of the table helps to move the hoop and carry out the process of sewing the embroidery pattern.

48. Puckering:

The fabric is pulled by the stitches in the embroidery because of improper tension caused by insufficient backing support and stabilization, stretchy fabric, and loose hoops.

49. Rotate Pattern:

A programmed parameter set on a computerized embroidery machine that rotates the design by 90-degrees, with or without making a mirror image of the design.

50. SPI:

An abbreviation for Stitches Per Inch of an embroidery machine. It is expressed by measuring the number of lengths of threads present within one inch in embroidery.

51. SPM:

An abbreviation for Stitches Per Minute of the embroidery machine, referring to its running speed, or the number of stitches it can sew in one minute.

52. Stitch Count:

A count of the number of stitches present in a logo or a particular embroidery pattern. The stitch count increases with the size of the logo or design.

53. Stock Designs:

Digitized embroidery designs are available ready to be stitched onto fabrics through embroidery machines for a vast number of customers, available at a cheaper rate than custom-digitized designs.

54. Tackle Twill:

Cuttings of letters and numbers from rayon twill fabric stitched onto clothes, especially sports jerseys with adhesive backing. The edges are then stitched in a zigzag pattern.

55. Tearaway:

Non-woven thin material is placed temporarily under the back surface of the fabric being used for embroidery. The material can be torn off after completion.

56. Tubular Embroidery:

Embroidery is made using a computerized embroidery machine that helps sew designs on cylindrical or tubular garments like socks, sleeves, jeans, etc., after assembling the garment.

57. Underlay:

The skeleton or basic framework stitches of an embroidery design. These stitches are made before the main decorative stitches to provide support or foundation to the design.

58. Variable Sizing:

The ability to determine the size of a particular design on a digitized embroidery machine by scaling the size up or down as per need.

59. Zigzag:

A side-to-side stitching pattern is used particularly for seams and decoration. The back-and-forth stitching technique is helpful in cases where a straight stitch isn’t enough for reinforcing.

Source: https://www.cre8iveskill.com/blog/a-to-z-glossary-on-embroidery-digitizing


Tuesday, September 28, 2021

Industries That Thrive Due To Graphic Design | Cre8iveSkill


 Graphic designs lend a touch of beauty to practically every industry in today's world. Can you think of an advertisement campaign with an attractive logo or a gaming interface without a smart design? Even the hundreds of websites we go through every day would look drab and wouldn't be so user-friendly if graphic designers were not present in the scene. Needless to say, the beauty of graphic designing has a vital role to play in creating an impact.


Cre8iveSkill is a pioneer in graphic design service, flawlessly helping clients convert their embroidery into digitized artwork format. The clients demand high-quality prints at an affordable price point. Vector art has enabled digital and screen printers to print their designs having high-quality graphics without sacrificing detail or clarity. Designs are becoming more intricate and detailed. The precision and detail that go into the graphic designing services help designers create scalable designs without distortion. Hence, the vector images can be printed on the apparel without any loss in clarity & quality. Vector art provides an accurate reproduction, which means no tears or distortion when printed on fabric. 

                    Graphic Art and Designing: The Upward Slope 


Graphic design has become indispensable to almost every industry. It wouldn't be an exaggeration to call graphic design the backbone of the virtual medium these days. From logo making to creating merchandise and promotional content, graphic designing services cater to the needs of all industries. Advertising and marketing industries would nearly be dysfunctional without the contribution of graphic designs.

However, they are not the only industries where graphic art plays a vital role. By transforming something simple into something outstanding, they make a stunning visual impact. The beauty of digital art across products, brochures, advertisement campaigns, apps, and websites, shows the range and contribution of graphic art.

Perhaps, the most significant use of graphic designing and art is its ability to produce vector images. . Even the best quality images may look blurry and distorted when resized according to specific needs. This ruins the appeal and negates the entire purpose behind the art.


Vector conversion is the only method through which images can be resized to any extent without distorting or hampering the visual impact of the end product. Original images are traced to form vector images using vectorize image illustrator for future use. Vector graphic design is specifically essential for textile printing, digital embroidery, and merchandize products to maintain impeccable quality and visual appeal standards.  is the only method through which images can be resized to any extent without distorting or hampering the visual impact of the end product. Original images are traced to form vector images using vectorize image illustrator for future use. Vector graphic design is specifically essential for textile printing, digital embroidery, and merchandize products to maintain impeccable quality and visual appeal standards. 

                                Top Thriving Industries that rely on Graphic Designing 


Even though nearly all industries and sectors run on graphic designs, some industries depend entirely on their services. No wonder graphic designers have a plethora of career options and streams open in front of them.  

Website Development

Graphic designing is one of the pillars of website development. Websites cannot function without the contribution of graphic designs in the content and appearance sections. It increases the site's value to the target audience. By increasing the website's visual appeal, graphic designs help communicate and resonate with the audience, creating the company's brand value. A website is practically useless and highly drab without a convenient user interface, animations, an attractive brand logo, typography, etc.

Graphic art and designing also perform the significant task of fulfilling a company's marketing objectives by incorporating them into website development. It works on visual impact and user experience to influence people the right way.

Not to forget, the more appealing and user-friendly a website is, the more traffic it generates, and simultaneously, more revenue is generated because of better search engine rankings. 

Print Media

A large part of print media survives on graphic designing. Visual appeal and aesthetics are vital in print media, and without the contribution of graphic designs, an attractive presentation wouldn't have been possible. Everything from billboards to magazine covers and newspaper formats heavily depends on graphic designers. They establish the foundation of communication between the audience and the client.

The purpose of graphic designing in print media is to give a visual form and presentation to a specific concept and help it reach out to the target audience by reinforcing the communication through the visual message and appeal.

Several print advertising campaigns also take the help of graphic designers to create marketing logos, layouts, banners, and vector images of their products. Right from the logos that reflect the theme of the magazines to the interesting features of the typography you appreciate, or the striking book covers, flyers, and brochures you come across are all created by graphic designers. 

Gaming

Even though the game design has come a long way and differentiated itself in various ways from graphic design, there still lies a significant contribution of graphic designers to the world of gaming.

A vital area where graphic designing plays a significant role in gaming is the user interface. A graphic designer is responsible for the design and arrangement of the visual layout and components of the game. The player uses the tools and interacts with the system through the user interface. The better the UI, the better is the player's experience.

A graphic designer lays out the iconography and the menus to help you navigate while playing a game. Only a trained designer can use the proper techniques to increase user experience and offer the best visual appeal.

Social Media

Social media thrives on graphic design. The interface and user experience on social media platforms heavily depend on graphic designing and would be a failure without it. Moreover, the visual appeal, layout, and navigation that make social media so popular and convenient wouldn't be possible without graphic designers creating the interface from scratch. Also, the place of social media in advertising and marketing is undeniable today.

Social media marketing is a whole field of study now. It goes without saying that graphic designers contribute considerably to creating dynamic promotional content for social media to increase engagement and reach their target audience. 

Animation

The very basis of animation is graphic designing. From animated movies that entertain us to the advertisements on electronic media or the visual effects in films, all have their roots in graphic art and designing. The conceptualization, sketching, and formation of the characters in an animated movie from scratch to completion before animating them is a work of immense skill and precision. Graphic artists and designers have genuinely taken the animation industry to new heights.

Create Your Graphic Designs with Cre8iveSkill


Can’t wait to use Graphic Designs for your business? Choose Cre8iveSkill services to create the best graphic designs to digitize your dreams and visions. Grab the opportunity to turn your ideas into visual art for future commercial purposes. Cre8iveSkill expertizes in creating graphic art, designing, and vector art conversion to use digitized designs for various requirements.

More than 25 years of experience and knowledge go into proficient services to custom create graphic designs and vector art of unparalleled quality. When you partner with Cre8iveSkill, expect flawless artwork from our digitizer’s team. They specialize in any form you want to see turn into virtual art. The talented team also expertizes in vector conversion for screen printing, textile printing, or any kind of promotional merchandise needs. Whatever artwork or idea you present is traced and converted to a digital file to transfer it to form a logo, print it on products, or reproduce the work on fabric. The team puts in their best efforts to create stunning graphic art that pays attention to minute details and satisfies the clients' needs. Another commendable feature is the advanced technology that further enhances the skillset into vector graphic designing services.

Consult the skilled team to see your customized designs or ideas come alive as captivating digital art.


Thursday, September 23, 2021

How Can Used To Vector Art Industry For Maximum Benefits | Cre8iveSkill


Vector design is the backbone of most digital art and graphics because it's scalable and doesn't lose quality when zoomed in or out. It means that no matter what industry you're in, whether you're an interior designer, advertising agency, or fashion designer, vector designs can be used to help promote your business to unimaginable extents.

Vector designs are a great way to add some graphics and communicate ideas in an easy-to-understand format. But, how can you use vector design in your industry for maximum benefits?

This blog post will share the basics of vector design and what it means for your business. We at Cre8iveSkill will help you discover how to use vector designs for your business.

We'll also share some examples of different industries that have used this strategy successfully so that you can see what's possible!

Are you ready? Let's get started!

What is Vector Designing?

Vector designs are a form of art that is becoming popular in the digital age. These images are created with shapes and lines instead of using paint as traditional artists do. The definition of a vector is a graphical image that can be scaled to any size without losing resolution. Vector images are created by mathematical formulas and do not use pixels as a form of measurement.

Vector graphics allow for infinite scaling, making them perfect for web graphics or logos because they don't lose their quality when zoomed in on or blown up to larger sizes.

Vector designers can use these to create logos for your business or company and other marketing materials such as flyers, billboards, posters, car wraps, and more!

Scope of Vector Designing:


Vector designing is not just limited to graphics, though - it can be used in many different industries. For example, interior design projects often use vector artwork when designing the layout of an office space or home decorating project. Graphic designers will also often incorporate vector artwork when creating newsletters or presentations; even fashion houses have started incorporating vector designs into their clothing line!

This article will explore how you can use this art to expand your businesses and explore the new horizons of untapped potentials vector designing presents to your industry.

Why Raster Designs Are A Thing Of The Past? 

Designing a logo requires creativity and attention to detail. Over the years, designers have had to change their methods due to advancements in technology that made it easier for them to create designs and logos themselves.

Cre8iveSkill has been in the print industry for years and has seen just about every type of design there is. In the era of digital design, we have seen that people are now being introduced to new ways of designing with ease. Raster designs and images have now been superseded as designers have long begun to use vector graphics more and more.

Raster to vector conversion is now leading from the front. Let's look at what raster images are and why they became obsolete in your field.

Raster designs lost their popularity for two significant reasons:
1) You cannot scale your images without losing quality. Images are significantly disrupted due to enlargement.
2) Raster graphics take up much more storage space than vectors do.

Raster designs also became less and less popular with time because editing and designing them was a hectic and cumbersome task. Like Adobe Illustrator or Photoshop, modern computer programs allow you to make changes much more quickly than before, which means you don't need as much patience or skill as an artist.

With the rise in popularity of computer-aided design (CAD), raster designs and images have begun falling out of favor. Vector graphics offer significantly higher quality than rasters while maintaining a high-level detail unmatched by most other types or formats.

Raster designs are a thing of the past because they're outdated, difficult to use, and don't meet today's customer needs. They're hard on the eyes too! On the other hand, Vector graphics are easier to edit and scale up or down while maintaining quality. For these reasons, many designers have switched over to vector-based solutions for new projects. 

How Can Vector Designs Create Impact in Industries?


Vector designs can be used to create an impact in almost every industry there is. Healthcare, education, fashion, entertainment, and tourism, etc. you name it. With the increase in technology, vector graphics have become more popular than ever before. They are an excellent way for businesses to showcase their products or services with minimal cost. Not only that, but they can also change how people perceive your company or organization by making it look professional and high-end.


Vector designs are all about creativity! There is no limit to what you can design using vectors because there is no worry about resolution size like when working with images. Vector graphics allow you to edit the image without losing quality or clarity, which means that your design will always be sharp and crisp on any screen size!

Vector designs are an excellent way to create an impact for your company. They have the power to take any design and make it stand out. Vector design is a graphic art that uses geometrical shapes, lines, curves, or points on computer screens, tablets, or other electronic devices to form images.

Vector graphics can be found in many industries, including print media, web designing, and video game development. Vector art is a modern tool in advertising that can be used to create eye-catching visuals.

If you're looking for a solution that will help your business stand out from the crowd then, vector designs may be what you need!

Vector Images vs. Raster Images:


Vector art is a type of computer graphic that represents images as mathematical objects rather than pixels. The photos are mostly vectorized using an image illustrator.

On the other hand, raster images are created using horizontal rows and vertical columns of tiny, rectangular pixels. Pixels are arranged in a grid formation to represent each part of the raster image.

The pixelation of the raster images significantly reduces the quality of the pictures when they are enlarged.

So the main takeaway here is that there are numerous benefits of using digital art vectors compared to digital art rasters.

The main benefit of vector art is the ease of editing the artwork and changing it. Still, there are other benefits like not having to worry about file size for your final product because it's scalable and vector-based, compatible with all devices (mobile included). Your work will always look great no matter what device people use to view it on, saving time by not having to create multiple versions of artwork for different screens and devices.

Untapped Vector Art Service Potential for Different Industries 

Vector art is one of the fastest-growing graphics services, and it's no wonder. Vector artists can provide high-quality images that can be scaled up or down without losing image clarity.


That makes vector graphic designs perfect for a wide range of industries from web design to graphic design and any industry that requires complex, scalable imagery such as marketing industry, textile, and apparel printing industry, or even laser-engraved illustration works.
Let's go through a few industries to see how they incorporate vector services to scale their business to newer heights.

Value Addition On Apparel And Textiles:

With the advent of digital vector art and technological advances that allow for more precise placement of images on fabric, textile companies are increasingly choosing vector images for digital and screen printing.


Vector art has become a popular form for designers to draw their designs because it allows them to produce high-quality graphics without sacrificing detail or clarity. This increased popularity has led many textile printers to increase their use of vector art to keep up with demand from clients who want high-quality prints at an affordable price point.

Designs are becoming more intricate and detailed. The use of vector art in digital and screen printing is a way to create designs that are scalable without distortion. Hence, the vector images can be printed on the apparel without any loss in clarity & quality. Vector art provides an accurate reproduction, which means no tears or distortion when printed on fabric. Vectors also allow designers to change color without worrying about gradients or half-tone effects.

Vector images provide higher quality prints than raster images. They are also more convenient because they do not need to convert from one format to another like most image files. Vector art also helps save money by reducing the need for additional work after screen printing because there's less ink required when using this type of graphics.

Marketing Companies:

 Vector art has been around for decades, but it's only recently begun to be used in marketing and advertisements. With the advent of digital art, vector graphics have become more popular than ever before.

That is because they are easily customizable, scalable, and versatile, making them an excellent choice for promotional printing work where you need your designs to look professional yet unique.

Vector artwork has many benefits for marketers, advertisers, promotional product suppliers, and printing companies. For starters, vector art is more cost-effective than photography because it uses less ink; this means that you can get more designs out of your budget. Vector graphics also allow designers to scale their designs without losing quality. This advantage benefits billboard advertisements a lot. Vector art also allows you to resize your image with ease, so it's perfect for anyone who wants their designs to fit in every possible space they might have available, such as for car wraps and signboards.

Finally, vector images are easier to edit than photographs or other images, making them ideal for digital advertising campaigns, promotional products, and billboards since they can be changed depending on what the marketer needs next!

Laser Engravings: 

Vector graphics are made up of lines, curves, and dots instead of pixels like in traditional bitmap images (like jpg). These lines can be moved infinitely without resolution loss or pixelation, so vector graphic files are typically smaller than their raster equivalents.

Those unique qualities make them perfect for laser engraving on wood, glass, or even metal.

Vector art is a great way to get your company logo or design engraved on various materials. There are many advantages to using vector graphics instead of other image formats such as JPGs and PNGs when it comes time for cutting or engraving designs on materials with a laser machine. Clarity, top-notch quality, and scalability are among the top benefits.

Embroidery Digitizing:

 As the world changes, so do the need for modern-day embroidery digitizing. Many people are looking for a more cost-effective and efficient method of digitizing their designs. One way to do this is by using vector art in conjunction with traditional forms of embroidery digitization.


Vector art allows you to auto-fill intricate designs with stitches without manually adding stitches out on the image, which means you can get your design digitized faster and cheaper! Embroidery digitizing companies use vector art for automatic stitching processes, with the auto-filling embroidery stitch tools to the object cleanly and clearly.

Vector art is all about computer-generated images that contain information on shape, color, line width, texture, etc., which allows for crisp lines and designs. They also save your time because vector graphics don't have to be manually drawn or colored by hand, unlike traditional embroidery digitizing.

Enhance Your Creativity with Cre8iveSkill


You don't have to go elsewhere or search on Google to know how we have been revolutionizing vector art services for decades, 25 years to be exact. With very few players in the market, we have emerged to being the pioneers of this beautiful industry with consistency, expertise and customer acknowledgment..

You know, vector artwork is fascinating because it allows for so much creativity. The best part about us here at Cre8iveSkill is that we have mastered this art. We have honed our skills to show you the creativity of unimaginable levels, something that you may never have seen before.

Cre8iveSkill offers several solutions for converting your drawings into high-quality vector images. With our software tools, top-notch expertise, state-of-the-art machinery, and quick turnaround time, you can get your design out there in no time!
I know it's hard to believe; we are actually really that good. Want to know even more? Check out our website, place your order and decide it for yourself. 

Source: https://www.cre8iveskill.com/blog/how-can-you-use-it-in-your-industry-for-maximum-benefits

Monday, September 6, 2021

How to Designing Graphics Printful Embroidery Design Guidelines

What Is Graphic Design?

In its simplest explanation, graphic design is the art of communicating messages. But not just any kind! The communication medium is pictures and symbols.

If you ask most people, they will say that graphic design is a modern concept. While the term may have been coined as recently as the 1920s, the truth is that graphic design traces its origins all the way back to before humans used language for communication. 

Remember the Egyptian hieroglyphs or the cave paintings we're still discovering today? They're all excellent examples of art with a purpose—communication. Where Can It Be Used? 

Since graphic design communicates ideas or messages using a visual medium, it can be used everywhere—from something as simple as a business logo to something as complex as page layouts on a magazine or a website. This is why the graphic design industry is huge! 

Whether it's signages or motion pictures, the garment industry or packaging, digital mediums like web and mobile design and software interfaces or print form like book covers, product labels, infographics—the list are never-ending!

What Does Cre8iveSkill Do? 

Crea8iveSkill provides design services. More specifically, we are a one-stop solution to all your embroidery and vector art needs—be it digitizations, conversions, illustrations, and vector design services

Our Specialty 

Designing Graphic for Embroidery:

While graphic design use is widespread, most people are under the impression that one art form can be used across several mediums. Confusing? Let's simplify that! 

A graphic art file of a business logo in a JPG or PNG file cannot be used for another medium like, say, embroidery. 

Desktop graphic design software platforms such as MS Paint, MS Powerpoint, Adobe Photoshop, etc., do not have the format required to be used for digitized embroidery. This is where specialized software similar to AutoCad like MyEditor, DRAWings PRO X, BES Embroidery Software, or Amazing Designs-Digitize N Stitch come into play. What Does This Kind of Software Do? 

Embroidery software performs all functions related to graphics design for embroidery. It allows creators to make their designs from scratch, for instance. You can also transform and edit shapes and add text where necessary. Other options that embroidery software offers include dropping names, cutting, stitch editor, color change, creating embroidery files, and so much more. This is why using embroidery-specific software results in stunning designs. 

But many people don't use embroidery software for their designs. A business might have a graphic designer work on their logo for print or business cards, perhaps even a website. But to embroider that logo on official t-shirts or caps, the image file needs to be converted into stitch files with specialized embroidery digitizing software. Here's a list of what's available: Vectorizer 

Embroidery digitizing software includes vectorizer tools that help convert vector drawings into embroidery designs and vice versa. A vectorizer is essential as it helps determine the stitch type and object type for each given shape. 

Auto-Digitizing


Auto-digitizing offers design professionals control over conversion settings that support functions such as recognizing shapes in vector, artwork, or bitmap.

Digitizer Design professionals depend extensively on digitizers to increase the accuracy of design structures from raster or vector images. It works by generating stitch representations. Lettering 

Since the text is included in graphic designs, professionals need to optimize stitch fonts via lettering features.

As is evident, digitizing software for the embroidery works differently and requires a unique skill set to produce these designs. The software works by taking graphic designs and creating X and Y-axis paths. It then generates stitches and stitch points that embroidery machines can read. These guidelines help the embroidery machines place stitches and make a stitched design on a given fabric.  

Printful Embroidery Design Guidelines


When designing for embroidery, a design professional needs to work within set guidelines to ensure that the graphic can be successfully translated to embroidery. If you're interested in designing graphics for embroidery, here is a list of technical specifications to remember: 

          In General

  • The text should be a minimum of 0.25'' tall and at least 0.05'' thick  
     
  • The width of the stitch should be a minimum of 0.16".
     
  • The outlined text should be a minimum of 0.5" tall
     
  • Large fill areas should be avoided on lightweight garments.
     
  •         Shadows and blending are challenging to reproduce for small designs 
    Vector-based EPS files are the ideal format when providing artwork to an embroidery company like Printful|
     
  • The larger and cleaner the file, the better the final result—use 300 DPI images

    For Polos

  • For pique (not jersey) knits 0.25'' text is recommended
     
  • The standard size for a front logo design is 2.5" to 4" wide x 1" to 2" tall
     
  • For more prominent size logos, try the sleeve or back yoke area as you can go as large as 5" wide and 3" tall

    For Caps

     
  • The text should be a minimum of 0.25'' tall
     
  • The maximum size for the front is between 4" - 5.5" wide and 1.75" - 2" tall, depending on the style of hat (beanie, high profile, and low profile
     
  • The maximum size for the side embroidery on a cap is 2" x 1", and 10 characters per line 

Create Embroidery Designs from Artwork 

Artwork is breathtaking and often very complicated to replicate in embroidery. Too many tiny colors can lead to several thread knots at the back, blurred lines, fabric stretching, and even needle breaking. Use embroidery-specific software to convert complex designs into simple digitized files. You can also reduce the number of threads and colors to ensure the best output. Should you need help, our design services team is more than happy to work on your graphic design. 

Graphic Designing for Embroidery: Things To Remember

Digitization  

Embroidery designs follow a different process than printing. This is why files must be converted to a specific embroidery format, a vector file preferably in AI, PDF, or EPS formats. This is called file digitization. If you don't have provisions for these, a high-resolution PNG file will also work. A nominal one-time fee is charged for embroidery format conversion and file digitization by Printful. 

Image Size 

Images selected by you need to fit within a resolution range of 150 DPI and 300 DPI. Uploading bigger files or re-sizing low-quality photos will not help create a good design. The image will either blur or will have jagged edges, giving an unsatisfactory result.

Minimalist  While computers can duplicate complex designs with multiple colors and transparent effects, that is not the case with embroidery machines and threads. It is best to follow a minimalist approach with embroidery—solid background with a simple logo or design. You'll get tight lines and a polished look. 

Limited Colors  

Less is better in this case, too. The fewer your color choices, the more polished the end design will be. Printful offers fifteen colors but limits selection of up to six colors per design, irrespective of embroidery type.  

Symmetry  

Placement of embroidery designs on custom clothing, be it hats, polo shirts, jackets, bags, etc., is critical. It will be counterproductive to have an embroidered patch that is lopsided. Center your design in Printful's embroidery template and ensure that you span out equally in both directions from there. If you are worried about the actual result, get Printful's embroidery samples before ordering in bulk.  

Backgrounds 

When we say backgrounds, we mean both—large filled areas behind your design and transparent or blank space. Large filled areas could be one solid color as well as multiple colors and patterns. Embroidery designs usually have a maximum of 15,000 stitches. Having either kind of filled background will consume a lot of your available stitch count. It will also increase the cost of your embroidery design order. Avoid backgrounds as much as possible or crop out whatever is not integral to your design. 

When working with large, transparent spaces, ensure your image is placed correctly. Don't center a small design with spaces between elements—crop and stretch the image to fill the maximum permitted area. 

If you have a lot of text or design with narrow negative spaces in between, fill them with color so that your design 'pops.'  

Printful's Specifications

Printful is a Print-On-Demand company through which you can express your ideas and creativity in vibrant thread colors. Whether you're embroidering polos, sweatshirts, bodysuits, bibs, bottoms, jackets, bags, and hats for personal use, gifting purposes, or for your business or online garment store, Printful is your go-to creative partner. Before submitting your graphic designs to Printful, you need to understand a few basics. Ensuring familiarity with the guidelines below will help you create or design graphical images suitable for embroidery file digitizing by Printful. 

Embroidery Type 

While there are several types of commercial embroidery, Printful offers the three most popular kinds—standard, 3D Puff Embroidery, and a Partial 3D Puff.  

Flat Embroidery 

As the name suggests, this is a simple embroidery style as threads are placed directly on the fabric, giving it a very flat appearance. This kind of embroidery is most commonly used on polos, hats, jackets, sweatshirts, etc. Flat embroidery is more suitable for designs that call for delicate work—thin strokes and less space between design elements. 

3D Puff Embroidery  

This kind of embroidery is used to give a pop-up appearance to embroidery designs. Typically, a layer of foam or fabric is added under the threads to provide it with the 'lift' necessary to be a 3D Puff design. This kind of embroidery work is excellent for larger designs that need a more dramatic effect. 

Partial 3D Puff  

This is a combination of both flat and 3D puff embroidery styles. Areas selected by you as 3D will use the puff method whereas, the other design elements will remain flat. Stitch TypeThe three most popular stitch types of Printful offers are Satin, Run, and Tatami fill.  Here's a guide to help you pick the best stitch to suit your design:

  • A minimum thickness of 0.05″ (1.3 mm) for shapes works best if you want flat embroidery 
     
  • If you wish to do a 3D Puff, please ensure that the thickness is between 0.2″ (5 mm) and 0.5″ (12.5 mm). Do also remember to leave a space of at least 0.07″ (1.8 mm) between 3D objects. 
     
  • Satin stitch is used for shapes that range from 0.05″ to 0.5″ while tatami stitch works better for forms that go beyond 0.5″ (12.5 mm)

  With over 25 years of experience in the vector artwork and embroidery digitizing industry, Cre8iveSkill has successfully served some top brands, suppliers, and distributors. Our extensive vector art expertise makes us the ideal vendor for all your day-to-day vector artwork and digitizing needs. 

More specifically, our most trained and talented operators and design professionals work on graphics designing for embroidery day in and out, putting our design services on par with Printful's design services. 

Source: https://www.cre8iveskill.com/blog/how-to-design-graphics-as-per-printful-embroidery-guidelines

Tuesday, July 27, 2021

Vector For Printing Services | vector tracing | Cre8iveSkill


Digital art is transforming the world by leveraging powerful technology. It is tempting, it is aesthetically pleasing, and most importantly, it gives you options. Options to save time, alter the designs with just a few clicks and create affordability. Amongst such ventures of digital art, vector tracing is the one that is gaining considerable traction. Vector images are getting pretty significant in use, especially in the embroidery and print segment of the fashion industry, precisely why you may require the vector tracing service to convert logos or pictures from bitmap formats into vector formats.

What Makes Vector Images Unique?

There are two common types of image files: vector images and raster images. The primary difference between the two is that raster images use small dots or pixels to construct a picture, while vector images use lines, curves, and shapes to draw a picture.

You will not see much of a difference between a raster image and a vector image of the same at a smaller size. The dissimilarity becomes apparent when you increase the image size. The raster image will become blurry, losing both quality and pixelation.

A vector image, however, does not regress with magnification or image enlargement. This stand-out feature of vector images has what made them so unique and famous. 

What is Vector Tracing?


The raster to vector conversion of the images is carried out through vector tracing.

Vector Tracing is a digital photo editing technique that works on image tracing. It converts the raster images in bitmap formats (.JPG, PNG, etc.) into Scalable Vector Graphics (.SVG). Photo editing tools like Coral Draw or Adobe Illustrator use mathematical algorithms to draw vector images. Vector images look sharp and clear in any scaled size, triumphing over the bitmap formats that get pixelated and distorted when magnified. 

Vector Tracing Services in Fashion Industry

This advantage makes vector images the ultimate designing choice in the fashion industry. Vector images can not only be used as logos and wallpapers; you can also print them on clothes as stickers and image labels. Just hand over your favorite and personalized pictures to trace to the vector tracing service of your choice and put the crispness of the images to good use.

Vector Art In Printing Services

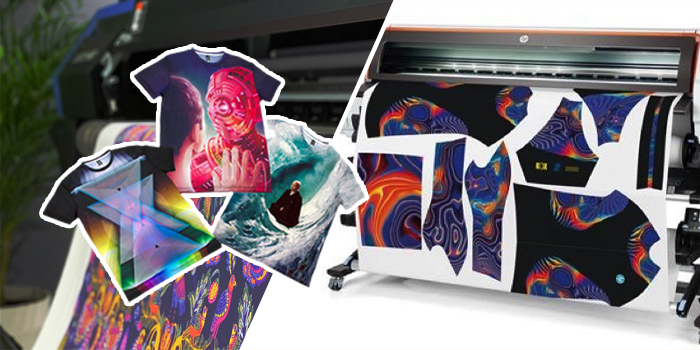
Vector tracing services are required for several printing methods like Screen Printing, Direct-to-Garment Printing, Direct-to-Film Printing, Sublimation Printing, and Reactive Printing are a few examples. Vector art is also used for Laser Engravings due to its higher quality. 

Let us get to know why vector art is crucial for these procedures.

• Laser Engraving: It is a practice of using lasers for etching a design or image on a solid surface like leather, glass, metal, or even textile materials. In the fashion industry, vector art in Laser Engraving is preferred if thin lines are engraved on the apparel. It is also faster than raster image engraving.

• Reactive Printing: This method uses reactive dyes and steam to print permanent designs on the fabric. Reactive printing using vector images is ideal when the images are complex, and lines and curves are sharper. 

• Direct-to-Garment & Direct-to-Film Printing: The main difference between DTG & DTF is that in DTG, the design is printed directly onto the fabric. While in DTF, the image is first printed on a transparent film and then coated with an adhesive to stick it onto the textile using a heat press.

These processes also deploy vector graphics because vector images quickly adapt to any resolution of the printing screen or the printing device.

direct to garment vector service

Sublimation Printing: Transfering a design onto a surface using ink and heat is Sublimation Printing. In this process, the image is first printed on a transfer paper, and then the fabric and the transfer paper are passed through a heat transfer machine. The image on the transfer paper is thus transferred to the material. It requires the printed image to have a high quality to get the best results. Vector images have no pixelation; hence they are the best choice.

The vector images can be printed on the apparel without any loss in clarity & quality using all such techniques. 

Top-notch creativity and skillset are required for this, which is why Cre8ive Skill has, in fact, made itself technologically advanced in the state-of-the-art machinery, quality software, and superior skills when it comes to vector tracing service.

vector service for sublimation

Why Are Good Vector Tracing Services Crucial?

vector tracing sevices

Every single thing communicates a message. Whether you are an individual or a business, you always need to convey the right message with whatever you choose. The image, colors, contrast, and quality play a key role in your brand or clothing items. You cannot risk an unprofessional image file provided by any low-quality service provider.

To get the very best out of the images or logos that you choose for vector conversion, you need someone who understands you and your requirements, all the while providing you the best value for money. Going for quality vector conversion services like Cre8ive Skill will ensure that you never regret your choice.

Which Vector Tracing Service You Should Choose?

Not everyone is determined to offer top-quality vector tracing & conversion at affordable prices in the fashion industry. Vector images are not just simple lines and curves; they require extreme attention as well.

Here comes the critical question. 

What exactly makes a vector tracing service stand out from the rest? 

Let me mention a few features that you should never ignore:

1. Experience & Expertise

That is, by default, the first and foremost requirement expected of any service. Always go for a vendor having a team with vast experience and expert graphic designers—one who prioritizes you and your satisfaction first. Vector art is a delicate and detail-oriented process. The vectorization should always be handled with care and precision., workmanship should be exceptional. And this comes with experience and expertise.

How about a service that will amaze you with accuracy, attention to detail, and extraordinary artwork? Here’s Cre8ive Skill who believes in customer satisfaction more than anything else. 

Are you looking for vector design for the fashion industry? Cre8ive Skill is the way to go with our machine-friendly designs and fine detailing.

2. Quality Checks

I would love to choose a service that would take care of all my needs while ensuring the design quality of my vector images. And I guess you would too. What’s even better? The artwork going through a controlled and efficient quality check system.

Cre8ive Skill provides you with just that. A sigh of relief and peace of mind for you while the quality control department goes through your vector images several times to guarantee top-notch individuality and defect-free artwork.

3. Avoiding The Use of Auto-Tracing

Let’s try to understand what automatic image tracing is and how it differs from manual drawing first. 

There are commonly two ways to draw a vector image using image vectorizer tools like Adobe Illustrator. 

- Manual Image Trace: This technique involves drawing the vector image by hand using a mouse or a graphics pen on a tablet to trace the image.

- Auto Image Trace: Automatic tracing uses software automation to detect the lines and curves of the raster image to create a vector image. The image trace tool in Adobe Illustrator and Scan2CAD are specific examples. Inkscape trace bitmap feature is another example.

Why strictly should the automatic photo tracer be avoided? It’s because the auto trace cannot recognize the low-resolution areas of the raster image accurately. Furthermore, automatic tracing results in inferior quality vector images if the color density of the raster images is very high.

Manual tracing, on the other hand, works with images of any quality. A human can always understand better than a machine were to draw a line or a curve and what the image should represent. It is more or less 100% accurate and even works for complex illustrations or photos.

For the reasons mentioned above, make sure that the vector tracing service you choose is vectorizing your images manually instead of just auto-tracing them. With Cre8ive Skill, you will get every vector image manually traced in vector file converter software to provide you with impeccable quality.

4. Efficient Delivery Timeframe

Make sure that your chosen vector designing vendor provides you with perfect image tracing in a reasonable timeframe. Though manual tracing takes time, it can’t be that they keep your image pending for an extended period of days or weeks.

If you want the delivery to be efficient and quick, Cre8ive Skill should be your choice. Most of the other vector tracing services have a turnaround time of 48-96 hours; cre8ive Skill, in fact, does it in 12.

After all, who doesn’t like quality work delivered right on time?

5. Reasonable & Affordable Price

Take a look around, and you may find services offering image vectorization at the starting prices of $60 going all the way up to $135 per image. Does that sound affordable even if it ensures quality work? 

Absolutely not. 

Here’s where Cre8iveSkill comes into play. Exceptional quality, aesthetically desirable designs, manual tracing, artistic and attractive visualization, quickest turnaround, and whatnot. Top-quality service with affordable prices, all the while taking care of your unsaid needs, there’s nothing you have to worry about. Hence, with Cre8ive Skill, you are in safe hands.


Source: https://www.cre8iveskill.com/blog/vector-tracing-service-how-to-choose-the-best-one

Friday, July 23, 2021

Jacquard Embroidery Machine: Masterpiece from history

It is mesmerizing how a piece of technology evolves with time. Who would have thought back then that an idea put into action by Jacques de Vaucanson and brought to life by Joseph-Marie Jacquard would have been a boom in the textile industry? Well, to see this classic Jacquard embroidery machine working is a delightful sight!


Back then, before Jacquard’s invention, a weaver’s assistant had to sit atop a loom, manually raise and lower its warp threads to create patterned cloth resulting in a slow and laborious task. With this valuable invention, the fashion industry had a 180- degree flip. The machine used interchangeable cards having small holes punched on them, which held instructions for weaving a pattern. On feeding into the Jacquard machine, the cards controlled the wrapping of threads.

Replication of patterns and designs was easy and efficient with this new advancement, causing a plummet in the cost of fashion, making it affordable for everyone. Fast-forward to 2021, we are still following the age-old embroidering methods, but with a touch of advanced technology that we call embroidery digitizing. Using software instead of punch cards in much faster and stable machines, we have a quicker turnaround time. All this is here, but there is no pleasure compared to watching a real Jacquard embroidery machine in action! 

 Video Courtesy: Embcon

Source: https://www.cre8iveskill.com/blog/jacquard-instructed-embroidery-machine-vintage-secret-of-modern-embroidery


Thursday, July 8, 2021

A Complete Guide for Embroidery Stabilizers | Cre8iveSkill


Are you looking for the right embroidery stabilizers? but unsure where to find one?

Keep everything aside and read our guide to find out.

It is upon an embroiderer to assemble all the crucial tools to get beautiful embroidery designs. A stabilizer is one of the important tools. It is for you to take some time to understand what a stabilizer is and the types of stabilizers.
Before understanding what a stabilizer is, you need to know that a stabilizer can provide more professional results and impressive designs.

 What is Embroidery Stabilizer?


A stabilizer is a crucial tool for supporting a piece of fabric to keep the stitching from puckering or stretching. It is, therefore, essential to choose the right stabilizer for an embroidery design. You, as an embroiderer, must take an ample amount of stabilizer to make the design look beautiful.

There are three types of stabilizers:
● Cut-Away
● Tear-Away
● Wash-Away

There are several weight categories of a stabilizer, and you have to consider the following criteria.

● You can select the weight of the fabric that resembles the cloth.
● You can select the weight as per the stitch count.


In a nutshell, the greater the stitch count higher should be the weight of the stabilizer.

How to Choose a Stabilizer?

There are some of the most essential factors that you should consider to select the most suitable stabilizer:

1. Fabric

One of the most important rules is utilizing a cut-away stabilizer when you are embroidering knits or stretchy fabrics. The cut-away type will protect the embroidery process and keep the stitches from puckering for a long time.

The next rule that you should keep in mind is about weight. You must ensure that the weight of the stabilizer and the weight of the fabric are the same. If you are considering a heavy fabric, you must select a stabilizer accordingly. On the flip side, if you choose a softer fabric, you must choose a stabilizer that is lighter in weight.

You should keep in mind that you should look for a stabilizer that is water-soluble in nature for a piece of sheer fabric. This is because you do not want the bits of stabilizer to be seen from the right side.

The design also plays a crucial role. You should have a light design for a soft fabric. Conversely, your fabric can become too busy with stitch-intensive design.

2. Embroidery

The number of stitches in a fabric and the choice of a stabilizer are interdependent. If you have more stitches in a piece of fabric, you should select a heavier stabilizer.

You can leverage a design that consists of an underlay to offer a base to the stitches. For a particular design, you have to think of the weight of fabric and stabilizer.

3. Appearance

In many cases, when you have stabilizers on the backside of a fabric, the stitches and designs look very messy and complicated. In such a case, you can look for stabilizers that are water-soluble in nature.

This way, you won’t have to make the other side of the fabric look bad. In case you are fine with the removal of a stabilizer, you should look for a tear-away stabilizer. If you are using a cut-away stabilizer, you should ensure that the excess must be the cut-away stabilizer, on the back of your fabric.

4. Feel

The type, as well as the weight of an embroidery stabilizer, would influence a fabric’s drape. If a stabilizer is heavy, it would add weight to the fabric. Moreover, when a stabilizer is lightweight, the drape of a stabilizer should be longer.
If you wish to have no additional weight, you can choose a wash-away stabilizer for a better touch and feel.

Which stabilizer Should you Opt for?

There are many guides and manuals on the Internet that would tell you to look for a specific type of stabilizer for all your designs. However, this is not true.
Actually, all three types of stabilizers are useful for an embroiderer seeking professional designs.

1. Cut-Away Stabilizer


Cut-away stabilizers are of the permanent type, and they are the most stable of all. This type of stabilizer would continue to keep the stitches of your design stable for a long-time. You can use a cut-away stabilizer for clothes and fabrics that are to be worn and washed regularly.

Examples of cut-away stabilizers

Some of the examples of the use of cut-away stabilizers are Knits, Sweatshirts, T-shirts, etc.

2. Tear-Away Stabilizer                                                                  


A tear-away stabilizer can be utilized for any type of stable fabric that is woven. This type of tear-away stabilizer does not stretch. In case, you want to ensure that you are using a tear-away stabilizer, you can use your fingers to scratch and tear the stabilizer towards the stitch.


Examples of tear-away stabilizers

Some of the examples of the use of tear-away stabilizers are Vinyl, Leather, Towels, etc.

3. Wash-Away Stabilizer


A wash-away stabilizer is used for any sheer fabrics. Once you are done with the embroidery, you should ensure to cut the excess stabilizer and then wash the design in the warm water.

If you want to test the stabilizer, you can put the stabilizer under the running water. In case it doesn’t appear, you can soften it by adding a hair conditioner

Examples of wash-away stabilizers

Some of the examples of wash-away stabilizers are freestanding lace, cutwork designs, 3D.

Final Words

This was a detailed guide on machine embroidery stabilizers. As we have discussed earlier, you would need to learn which stabilizer to use for which fabric.

However, you should not have a favored stabilizer. This is because you won’t be a professional embroiderer if you only stick to a type of fabric and design. Feel free to bookmark this guide and use it when you want to learn about different stabilizers.

Machine embroidery is an art, and practicing art can take a lot of time. However, once you are clear about the technicalities, you can quickly learn to become an expert embroiderer.

We at Cre8iveSkill have an experience of more than 25 years in contract embroidery, employing more than 172 heads and technically sound team of expert machine operators. You can call on us for any technical query, Custom embroidery patches, embroidery digitizing and vector art services.

Source: https://www.cre8iveskill.com/blog/a-complete-guide-to-machine-embroidery-stabilizers